
Uwaga: Usługa nie jest dostępna w wersji SaaS
Aby prawidłowo skonfigurować IIS, postępuj zgodnie z odpowiednimi instrukcjami w zależności od wersji systemu operacyjnego Windows.
Windows 10
W oknie Funkcje systemu Windows upewnij się, że zaznaczone są wszystkie poniższe opcje, a następnie kliknij OK:
-
.NET Framework 4.8 Advanced Services
![]()
-
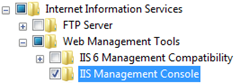
Internet Information Services > Web Management Tools > IIS Management Console
![]()
-
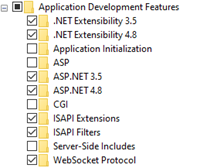
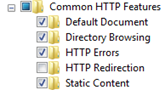
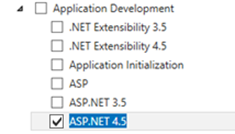
Internet Information Services > World Wide Web Services > Application Development Features > ASP.NET 4.8 oraz WebSocket Protocol
-
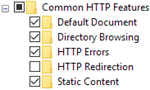
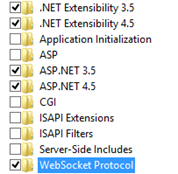
Internet Information Services > World Wide Web Services > Common HTTP Features > Static Content
Windows 7
W oknie Funkcje systemu Windows upewnij się, że zaznaczone są wszystkie poniższe opcje, a następnie kliknij OK:
-
Internet Information Services > Web Management Tools > IIS Management Console
-
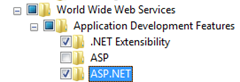
Internet Information Services > World Wide Web Services > Application Development Features > ASP.NET
-
Internet Information Services > World Wide Web Services > Common HTTP Features > Static Content
Windows 8.1
W oknie Funkcje systemu Windows upewnij się, że zaznaczone są wszystkie poniższe opcje, a następnie kliknij OK:
-
.NET Framework 4.5 Advanced Services
![]()
-
Internet Information Services > Web Management Tools > IIS Management Console

-
Internet Information Services > World Wide Web Services > Application Development Features > ASP.NET 4.5 oraz WebSocket Protocol
-
Internet Information Services > World Wide Web Services > Common HTTP Features > Static Content
Windows Server 2016
-
W kreatorze Add Roles and Features, na stronie Server Roles, upewnij się, że zaznaczono opcję Web Server (IIS), a następnie kliknij Next.
![]()
-
Na stronie Features zaznacz opcje:
-
.NET Framework 4.6 Features > .NET Framework 4.6 oraz ASP.NET 4.6
-
![]()
-
Kliknij Next.
-
Na stronie Web Server Role (IIS) kliknij Next.
-
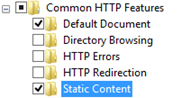
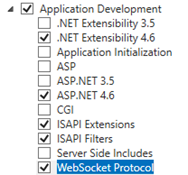
Na stronie Role Services zaznacz pole ASP.NET 4.6 (w sekcji Application Development).
-
Kliknij Next, a następnie Add Features.
-
Na tej samej stronie upewnij się, że zaznaczone są również opcje (w sekcji Application Development):
-
.NET Extensibility 4.6
-
ASP.NET 4.6
-
ISAPI Extensions
-
ISAPI Filters
-
WebSocket Protocol
-
-
Kliknij Next, a potem Install.
-
Po zakończeniu instalacji kliknij Close.
Windows Server 2012
-
W kreatorze Add Roles and Features, na stronie Server Roles, upewnij się, że zaznaczono opcję Web Server (IIS), a następnie kliknij Next.
![]()
-
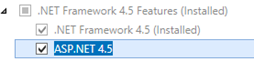
Na stronie Features zaznacz opcje:
-
.NET Framework 4.5 (Installed)
-
ASP.NET 4.5
-
-
Kliknij Next.
-
Na stronie Web Server Role (IIS) kliknij Next.
-
Na stronie Role Services zaznacz pole ASP.NET 4.5 (w sekcji Application Development).
-
Kliknij Next, a następnie Add Features.
-
Rozwiń sekcję Application Development i zaznacz również:
-
.NET Extensibility 4.5
-
ISAPI Extensions
-
ISAPI Filters
-
WebSocket Protocol
-
-
Kliknij Next, a następnie Install.
-
Po zakończeniu instalacji kliknij Close.